
一、博客搭建
1. 前言
Hexo 是一个快速、简洁且高效的博客框架。Hexo 使用 Markdown(或其他渲染引擎)解析文章,在几秒内,即可利用靓丽的主题生成静态网页。
中文文档:https://hexo.io/zh-cn/
2. 环境安装
Node.js环境搭建:Hexo需要依赖node环境
git:需要部署到GithubPage,就要用到git
3. 安装Hexo
npm install hexo-cli -g
4. 初始化Hexo
# blog为hexo博客的根目录,可以是相对路径也可以是绝对路径
hexo init blog
cd blog
npm install
5. 本地启动
hexo s
在浏览器中打开 http://localhost:4000/ 浏览
6. 成静态网页
hexo g
会在博客根目录中生成public静态网页目录
7. 部署到GithubPages
7.1 创建Github账号
7.2 创建仓库, 仓库名为:<Github账号名称>.github.io
7.3 将本地Hexo博客推送到GithubPages
7.4 安装hexo-deployer-git插件
npm install hexo-deployer-git --save
7.5 添加SSH key
- 创建一个 SSH key 。
ssh-keygen -t rsa -C "邮箱地址"
- 添加到 github。 复制密钥文件内容(路径形如
C:\Users\Administrator\.ssh\id_rsa.pub),粘贴到New SSH Key即可。 - 测试是否添加成功。
C:\Users\Administrator>ssh -T git@github.com
Hi zngw! You've successfully authenticated, but GitHub does not provide shell access.
7.6 修改博客根目录下的 _config.yml文件,在末尾修改为:
# Deployment
## Docs: https://hexo.io/docs/deployment.html
deploy:
  type: git
  repo: git@github.com:<Github账号名称>/<Github账号名称>.github.io.git
  branch: master
7.7 推送到GithubPages
hexo d
浏览器访问网址: https://<Github账号名称>.github.io
8. 部署到CodingPages
GithubPages 在国内较慢,百度不收录,而CodingPages 在国外较快。
8.1 创建Github账号
8.2 创建一个项目或直接进入示例项目,在项目中创建仓库, 仓库名为随意
8.3 获取项目的SSH地址
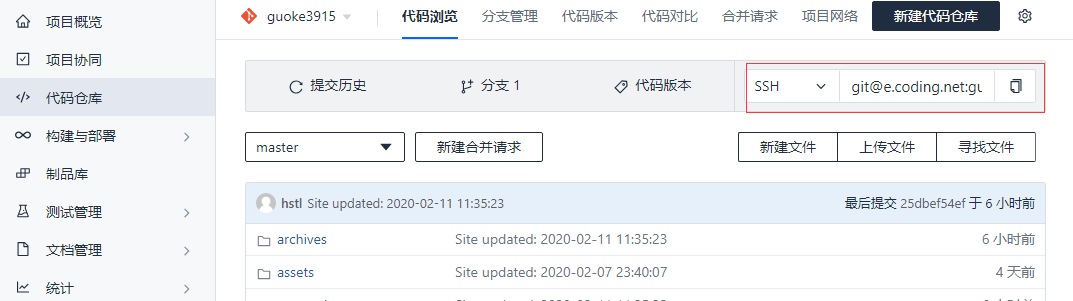
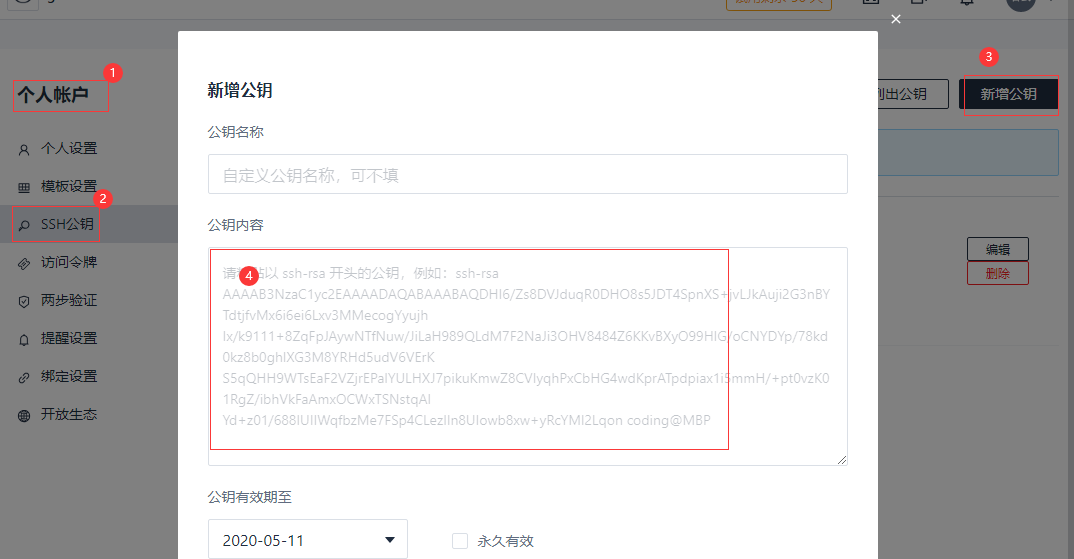
8.4 如前面 github一样。 复制密钥文件内容(路径形如C:\Users\Administrator\.ssh\id_rsa.pub),粘贴到个人账户里的SSH公钥中
8.5 测试是否添加成功。
ssh -T git@e.coding.net
Coding 提示: Hello xx, You've connected to Coding.net via SSH. This is a personal key.
xx,你好,你已经通过 SSH 协议认证 Coding.net 服务,这是一个个人公钥
8.6 修改博客根目录下的 _config.yml文件,在末尾添加:
deploy:
- type: git
  repo: git@github.com:zngw/zngw.github.io.git
  branch: master
- type: git
  repo: git@e.coding.net:guoke3915/coding-demo/guoke3915.git # 前面获取的SSH地址
  branch: master
8.7 推送到CodingPages
hexo d
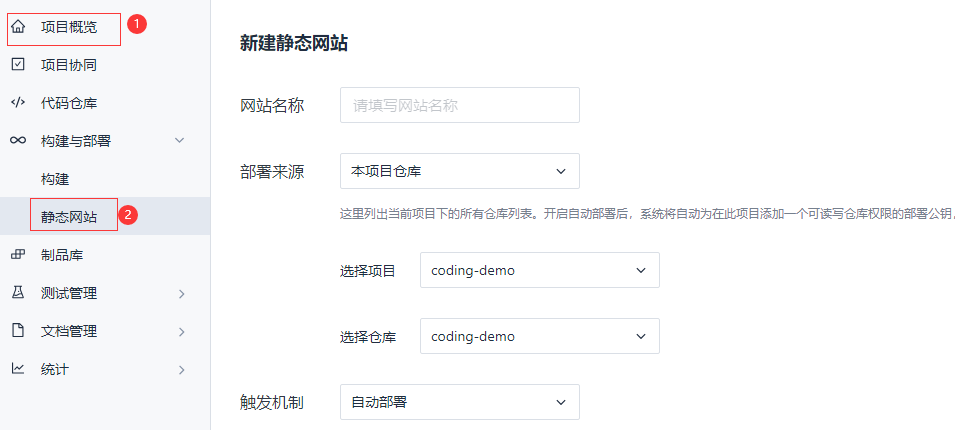
8.8. 开通静站网站
进入项目 中,新建静态网站
8.9 绑定域名
- 将域名用CNAME解析到CodingPages提供的*.coding-pages.com域名上
- 填写域名并绑定

二、添加分类及标签
1. 文章分类
1.1 生成分类目录
hexo new page categories
生成目录之后,会在根目录的source目录中多出一个categories目录。
1.2 分类配置
在categories目录中有一个index.md文件,在文件中添加type: categories
---
title: 分类
date: 2020-02-10 14:47:40
type: categories
---
1.3 增加多个分类
在categories目录中有一个index.md文件,复制多份就可以了
---
title: 分类一
date: 2020-02-10 14:47:40
type: categories
---

---
title: 分类二
date: 2020-02-10 14:47:40
type: categories
---
1.4 给文章添加"分类"属性
---
title: 文章标题
date: 2020-02-10 14:47:40
categories: 分类
---
文章分类属性只能存在一个,如果写了多个,只有第一个会启效果
2. 文章标签
2.1 生成标签目录
hexo new page tags
生成目录之后,会在根目录的source目录中多出一个tags目录。
2.2 标签配置
在tags目录中有一个index.md文件,在文件中添加type: tags
---
title: 标签
date: 2020-02-10 14:47:40
type: tags
---
2.3 增加多个标签
在tags目录中有一个index.md文件,复制多份就可以了
---
title: 标签一
date: 2020-02-10 14:47:40
type: tags
---

---
title: 标签二
date: 2020-02-10 14:47:40
type: tags
---
2.4 给文章添加"标签"属性
---
title: 文章标题
date: 2020-02-10 14:47:40
categories: 分类
tags:
  - 标签一
  - 标签二
---
文章标签属性可存在多个
三、链接持久化
1. 背景
使用Hexo后,默认的链接是 http://url/2020/02/10/hello-world 这种类型的,这是由年/月/日/标题组成。如果调整过日期会变化,还有就是标题是中文或存在特殊符号的时候这样的链接可能就有问题。
2. 安装hexo-abbrlink插件
npm install hexo-abbrlink --save
3. 配置
在根目录下的配置_config.yml里的配置:permalink
permalink: p/:abbrlink.html
abbrlink:
  alg: crc32  # 算法:crc16(default) and crc32
  rep: hex    # 进制:dec(default) and hex
生成之后的效果是这样的了http://url/p/2fe3da.html
4. 说明
- 如果文章头中存在
abbrlink,则不会做任何处理。 - 如查文章头中不存在
abbrlink,则会ettitle根据配置的alg算法来成生abbrlink字符串 - 当然,你也可以自己手动为特殊的文章写链接地址。只要在文章中配置好
abbrlink就可以了
title: Hexo博客
categories:
  - 软件使用
tags:
  - 博客
abbrlink: hexo-blog
date: 2020-02-09 15:55:55
四、本地图片
1. 前提
在Hexo插入本地图片的时候,生成静态页面的时候不会将图片复制到发布目录下,这样发布出去后就不会显示出图片了。
2. 安装转换插件
安装hexo-zngw-asset-image插件
npm install hexo-zngw-asset-image --save
3. 修改配置
打开根目录下_config.yml配置文件,修改
post_asset_folder: true
添加
imgroot: / #如查有第三方图片存储添写,如果用本地用`/`
4. 使用
- 在
*.md文件所在的目录下,创建与*.md文件同名的文件夹。如 在hello-world.md文件新建hello-world目录 - 然后将需要的图片放到
hello-world目录中 - 引用的时候使用

5. Typora MarkDown编辑使用
用Typora编辑文件时,可以调整一下图片插入配置,直接拖入本地图片或远程图片自动直接保存为*.md同名文件夹目录

五、使用next主题
1. 安装next主题
进入Blog目录文件下,通过git直接下载
git clone https://github.com/iissnan/hexo-theme-next themes/next
2. 使用next主题
打开Blog目录下的_config.yml文件,修改theme: next
3. 修改语言
next主题的中文语言是zh-Hans
打开Blog目录下的_config.yml文件,修改language: zh-Hans
4. 切换子主题
在themes/next/_config.yml文件中,有四个主题,选择一个喜欢的主题
# Schemes
#scheme: Muse      # 菜单在上边
#scheme: Mist        # 菜单在上边
scheme: Pisces        # 菜单在左边
#scheme: Gemini   # 菜单在左边
5. 设置菜单
打开themes/next/_config.yml配置文件,找到menu,也可以自己添加
menu:
  home: /|| home                          # 首页
  #about: /about/|| user             #  关于
  tags: /tags/|| tags                      # 标签
  categories: /categories/|| th   # 分类
  archives: /archives/|| archive # 归档
# Enable/Disable menu icons.
menu_icons:
  enable: true
6. 添加分类和标签
hexo new page "categories"
hexo new page "tags"
详细见:二、添加分类及标签
7. 修改图标
打开themes/next/_config.yml配置文件,找到favicon,修改自己的图标
favicon:
  small: /images/favicon-16x16-next.png
  medium: /images/favicon-32x32-next.png
  apple_touch_icon: /images/apple-touch-icon-next.png
  safari_pinned_tab: /images/logo.svg
  #android_manifest: /images/manifest.json
  #ms_browserconfig: /images/browserconfig.xml
8. 添加添加RSS
安装Hexo插件
npm install --save hexo-generator-feed
打开themes/next/_config.yml配置文件, 添加
rss: /atom.xml
9. 隐藏底部Hexo强力驱动、主题--NexT.Mist
打开themes/next/_config.yml配置文件,修改
  powered: false
  theme:
    enable: false
    version: false
10. 设置社交小图标设置
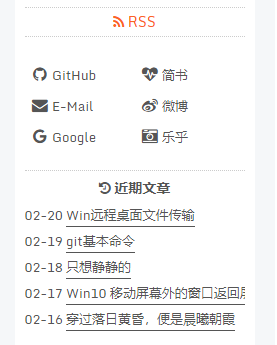
打开themes/next/_config.yml配置文件,修改
[社交平台名]: [社交地址] || [图标名称]
social:
  GitHub: https://github.com/zngw || github
  简书: https://www.jianshu.com/u/a51cd2236c13 || heartbeat
  E-Mail: mailto:55@mail.zengwu.com.cn || envelope
  微博: https://weibo.com/21592355 || weibo
  Google: https://plus.google.com/guoke3915 || google
  乐乎: https://zengwu3915.lofter.com || camera-retro

11. 设置推荐阅读
打开themes/next/_config.yml配置文件,修改
# Blog rolls
links_icon: link
links_title: 推荐阅读
#links_layout: block
links_layout: inline
links:
  Hexo官网: https://hexo.io/
12. 修改文章内链接文本样式
默认文章内链接没有特殊颜色,修改一下就和正常网页一下,默认是蓝色,鼠标移动上去成橘色
修改themes/next/source/css/_common/components/post/post.styl,在末尾添加CSS样式:
// 文章内链接文本样式
.post-body p a{
  color: #0593d3; //原始链接颜色
  border-bottom: none;
  border-bottom: 1px solid #0593d3; //底部分割线颜色
  &:hover {
    color: #fc6423; //鼠标经过颜色
    border-bottom: none;
    border-bottom: 1px solid #fc6423; //底部分割线颜色
  }
}

13. 修改底部标签样式
修改\themes\next\layout\_macro\post.swig中文件,command+f搜索rel="tag">#,将#替换成<i class="fa fa-tag"></i>。

14. 设置头像并设置动画效果
设置头像圆角并旋转,打开/themes/next/source/css/_common/components/sidebar/sidebar-author.styl,添加以下代码:
.site-author-image {
  display: block;
  margin: 0 auto;
  padding: $site-author-image-padding;
  max-width: $site-author-image-width;
  height: $site-author-image-height;
  border: $site-author-image-border-width solid $site-author-image-border-color;
  /* 头像圆形 */
  border-radius: 80px;
  -webkit-border-radius: 80px;
  -moz-border-radius: 80px;
  box-shadow: inset 0 -1px 0 #333sf;
  /* 设置循环动画 [animation: (play)动画名称 (2s)动画播放时长单位秒或微秒 (ase-out)动画播放的速度曲线为以低速结束
    (1s)等待1秒然后开始动画 (1)动画播放次数(infinite为循环播放) ]*/

  /* 鼠标经过头像旋转360度 */
  -webkit-transition: -webkit-transform 1.0s ease-out;
  -moz-transition: -moz-transform 1.0s ease-out;
  transition: transform 1.0s ease-out;
}
img:hover {
  /* 鼠标经过停止头像旋转
  -webkit-animation-play-state:paused;
  animation-play-state:paused;*/
  /* 鼠标经过头像旋转360度 */
  -webkit-transform: rotateZ(360deg);
  -moz-transform: rotateZ(360deg);
  transform: rotateZ(360deg);
}
/* Z 轴旋转动画 */
@-webkit-keyframes play {
  0% {
    -webkit-transform: rotateZ(0deg);
  }
  100% {
    -webkit-transform: rotateZ(-360deg);
  }
}
@-moz-keyframes play {
  0% {
    -moz-transform: rotateZ(0deg);
  }
  100% {
    -moz-transform: rotateZ(-360deg);
  }
}
@keyframes play {
  0% {
    transform: rotateZ(0deg);
  }
  100% {
    transform: rotateZ(-360deg);
  }
}
14. 主页文章添加阴影效果
打开themes\next\source\css\_custom\custom.styl,添加以下代码:
// 主页文章添加阴影效果
 .post {
   margin-top: 60px;
   margin-bottom: 60px;
   padding: 25px;
   -webkit-box-shadow: 0 0 5px rgba(202, 203, 203, .5);
   -moz-box-shadow: 0 0 5px rgba(202, 203, 204, .5);
  }

15. 网站底部加上不蒜子访问量
因为不蒜子域名改了,next 5.1.4版本还没有更新,所以,打开themes/next/layout/_third-party/analytics/busuanzi-counter.swig
<script async src="https://busuanzi.ibruce.info/busuanzi/2.3/busuanzi.pure.mini.js"></script>
打开themes/next/_config.yml配置文件,修改
busuanzi_count:
  # count values only if the other configs are false
  enable: true    # 开启统计
  # custom uv span for the whole site
  site_uv: true  # 开始uv总访问量
  site_uv_header: 您是第 # 数字前显示
  site_uv_footer:  位访客 # 数字后显示
  # custom pv span for the whole site
  site_pv: true  # 开始pv总访问量
  site_pv_header: 总访问量 # 数字前显示
  site_pv_footer:  # 数字后显示
  # custom pv span for one page only
  page_pv: false # 文章统计
  page_pv_header: <i class="fa fa-file-o"></i> # 数字前显示
  page_pv_footer: # 数字后显示

16. 添加LeanCloud文章统计
先去LeanCloud官网注册一个账号,创建一个应用,进入存储,创建名为Counter的Class
打开themes/next/_config.yml配置文件,修改
# Show number of visitors to each article.
# You can visit https://leancloud.cn get AppID and AppKey.
leancloud_visitors:
  enable: ture
  app_id: app_id
  app_key: app_key
17. 统计网站和文章字数
安装hexo插件
npm install hexo-wordcount --save
打开themes/next/_config.yml配置文件,修改
# Post wordcount display settings
# Dependencies: https://github.com/willin/hexo-wordcount
post_wordcount:
  item_text: true
  wordcount: true
  min2read: true
  totalcount: true
  separated_meta: true
找到语言文件themes\next\languages\zh-Hans.yml,修改totalcount: 全站字数

18. 添加站内搜索
安装插件
npm install hexo-generator-search --save
npm install hexo-generator-searchdb --save
打开themes/next/_config.yml配置文件,修改
# Local search
# Dependencies: https://github.com/flashlab/hexo-generator-search
local_search:
  enable: true
  # if auto, trigger search by changing input
  # if manual, trigger search by pressing enter key or search button
  trigger: auto
  # show top n results per article, show all results by setting to -1
  top_n_per_article: 1
19. 在文章底部增加版权信息
打开themes/next/_config.yml配置文件,修改为true
# Declare license on posts
post_copyright:
  enable: true
  license: CC BY-NC-SA 3.0
  license_url: https://creativecommons.org/licenses/by-nc-sa/3.0/
如果要修改内容,找到语言文件themes\next\languages\zh-Hans.yml,修改
  copyright:
    author: 本文作者
    link: 本文链接
    license_title: 版权声明
    license_content: '本博客所有文章除特别声明外,均采用
      <a href="%s" rel="external nofollow" target="_blank">%s</a> 许可协议。转载请注明出处!'

六、prism代码高亮
hexo 默认的代码高亮插件为 highlight.js,highlight在代码不标明语言的时候,好像不会自识别,然后在网上找到一个prism的高亮
1. 禁用highlight
打开根目录下的_config.yml文件,修改配置
highlight:
  enable: false
  line_number: false
  auto_detect: false
  tab_replace:
2. 获取prism
下载页面:https://prismjs.com/download.html;选择 theme 主题、language 支持的语言(不要选太多,够用就好)、plugin 插件(可以选Line Numbers、Copyto Clipboard Button,其他的看自己需求);然后点击下载按钮就行了;下载到本地之后,将它们重命名为 prism.js、prism.css,然后将它们放置到 $HEXO/themes/next/source/js/prism/ 目录下(prism 文件夹需要自己新建),即它们的路径分别是:
/themes/next/source/js/prism/prism.js
/themes/next/source/js/prism/prism.css
3. 配置 prism
- 修改
themes/next/layout/_partials/head.swig,在尾部添加以下代码:
<link rel="stylesheet" href="/js/prism/prism.css">
- 修改
themes/next/layout/_partials/footer.swig,在尾部添加以下代码
<script src="/js/prism/prism.js" async></script>
4. 修改博客配置
打开根目录下的_config.yml文件,添加下面代码
marked:
  langPrefix: line-numbers language-
4. 测试prism
清理后,重新运行直接测试
hexo clean && hexo s
七、gitalk评论系统
gitalk:一个基于 Github Issue 和 Preact 开发的评论插件
1. 优缺点
- 优点:页面简洁好看,可以去Github后台查看管理
- 缺点:需要github登录后才可以评论,国内访问比较慢
2. 注册Github应用
在GitHub上注册新应用,链接:https://github.com/settings/applications/new

参数说明:
- Application name: # 应用名称,随意guoke3915
- Homepage URL: # 网站URL,如https://guoke3915.icu
- Application description # 描述,随意
- Authorization callback URL:# 网站URL,https://guoke3915.icu ,好像只有指定网页的请求可以访问,其他网页进入时会出现验证错误
点击注册后,页面跳转如下,其中Client ID和Client Secret在后面的配置中需要用到,到时复制粘贴即可:

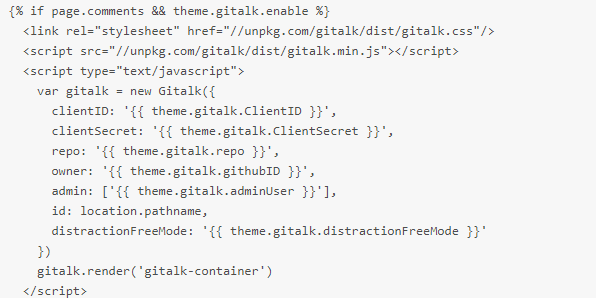
3. 创建gitalk.swig
新建/layout/_third-party/comments/gitalk.swig文件,并添加内容
{% if page.comments && theme.gitalk.enable %}
  <link rel="stylesheet" href="//unpkg.com/gitalk/dist/gitalk.css"/>
  <script src="//unpkg.com/gitalk/dist/gitalk.min.js"></script>
  <script type="text/javascript">
    var gitalk = new Gitalk({
      clientID: '{{ theme.gitalk.ClientID }}',
      clientSecret: '{{ theme.gitalk.ClientSecret }}',
      repo: '{{ theme.gitalk.repo }}',
      owner: '{{ theme.gitalk.githubID }}',
      admin: ['{{ theme.gitalk.adminUser }}'],
      id: location.pathname,
      distractionFreeMode: '{{ theme.gitalk.distractionFreeMode }}'
    })
    gitalk.render('gitalk-container')
  </script>
{% endif %}
4. 修改comments.swig
修改/layout/_partials/comments.swig,添加内容如下,与前面的elseif同一级别上
{% elseif theme.gitalk.enable %}
 <div id="gitalk-container"></div>
5. 修改index.swig
修改layout/_third-party/comments/index.swig,在最后一行添加内容
{% include 'gitalk.swig' %}
6. 新建gitalk.styl
新建/source/css/_common/components/third-party/gitalk.styl文件,添加内容
.gt-header a, .gt-comments a, .gt-popup a
  border-bottom: none;
.gt-container .gt-popup .gt-action.is--active:before
  top: 0.7em;
7. 修改third-party.styl
修改/source/css/_common/components/third-party/third-party.styl,在最后一行上添加内容,引入样式
@import "gitalk";
8. _config.yml
在主题配置文件next/_config.yml中添加如下内容
gitalk:
  enable: true
  githubID: github帐号  # 例:guoke3915
  repo: 仓库名称   # 例:guoke3915.github.io
  ClientID: Client ID
  ClientSecret: Client Secret
  adminUser: github帐号 #指定可初始化评论账户
  distractionFreeMode: true
八、ShareSDK分享功能
1. 注册
先要去ShareSDK注册账号和项目,然后得到项目的appkey, 获取网页分享代码,也可以根据文档自己写分享页面
<!--MOB SHARE BEGIN-->
<div class="-mob-share-ui-button -mob-share-open">分享</div>
<div class="-mob-share-ui" style="display: none">
    <ul class="-mob-share-list">
        <li class="-mob-share-weibo"><p>新浪微博</p></li>
        <li class="-mob-share-qzone"><p>QQ空间</p></li>
        <li class="-mob-share-qq"><p>QQ好友</p></li>
        <li class="-mob-share-douban"><p>豆瓣</p></li>
        <li class="-mob-share-facebook"><p>Facebook</p></li>
        <li class="-mob-share-twitter"><p>Twitter</p></li>
    </ul>
    <div class="-mob-share-close">取消</div>
</div>
<div class="-mob-share-ui-bg"></div>
<script id="-mob-share" src="//f1.webshare.mob.com/code/mob-share.js?appkey=你的appkey"></script>
<!--MOB SHARE END-->
2. 创建文件
创建文件themes/next/layout/_partials/share/sharesdk.swig的文件。将上面的分享代码复制过来,并修改appkey的值
<script id="-mob-share" src="http://f1.webshare.mob.com/code/mob-share.js?appkey={{ theme.sharesdk.appkey }}"></script>
3. 添加可选配置
虽然我们添加了sharesdk的分享的按钮了,但是如果有一天我们不想使用了呢。当然,很简单。只需要修改配置文件就可以了。那么如何实现呢?
首先,找到主题文件夹下的layout文件夹下的post.swig
找到分享代码段
<div class="post-spread">
      {% if theme.jiathis %}
        {% include '_partials/share/jiathis.swig' %}
      {% elseif theme.baidushare %}
        {% include '_partials/share/baidushare.swig' %}
      {% elseif theme.add_this_id %}
        {% include '_partials/share/add-this.swig' %}
      {% elseif theme.duoshuo_shortname and theme.duoshuo_share %}
        {% include '_partials/share/duoshuo_share.swig' %}
        {% elseif theme.sharesdk %}
        {% include '_partials/share/sharesdk.swig' %}
      {% endif %}
    </div>
添加了代码
{% elseif theme.sharesdk %}
        {% include '_partials/share/sharesdk.swig' %}
这段代码就是根据主题文件的配置,来为文档添加相应的swig文件。要想实现在配置文件中选择性的使用分享功能,只需要在配置文件中修改即可。
4. 修改_config.yml
接下来就是修改项目的配置文件了。在主题的配置文件中添加:
#Share
sharesdk: true
shareSDKappkey: appkey
九、 添加近期文章板块
在Hexo博客左侧导航栏中友情链接上面加入近期文章模块
1. 修改sidebar.swig文件
打开 next/layout/_macro/sidebar.swig 中的 if theme.links 对应的 endif 上面插入代码
{# Blogroll #}
{% if theme.recent_posts %}
  <div class="links-of-blogroll motion-element {{ "links-of-blogroll-" + theme.recent_posts_layout  }}">
  <div class="links-of-blogroll-title">
  <!-- modify icon to fire by szw -->
  <i class="fa fa-history fa-{{ theme.recent_posts_icon | lower }}" aria-hidden="true"></i>
  {{ theme.recent_posts_title }}
  </div>
    <ul class="links-of-blogroll-list">
      {% set posts = site.posts.sort('-date') %}
      {% for post in posts.slice('0', '5') %}
          <li class='pull-left' style="white-space:nowrap" >
            <time title="{{ __('post.created') }}" itemprop="dateCreated datePublished" datetime="{{ moment(post.date).format() }}">
              {{ date(post.date, config.mmdd_format) }}
            </time>
            <a href="{{ url_for(post.path) }}" title="{{ post.title }}">{{ post.title }}</a>
            <br>
          </li>
        {% endfor %}
      </ul>
    </div>
  {% endif %}
{# Blogroll #}
{% if theme.links %}
2. 设置主题配置文件
打开 next/_config.yml添加
recent_posts_title: 近期文章
recent_posts_layout: block
recent_posts: true
3. 设置时间格式
打开 _config.yml添加
mmdd_format: MM-DD
效果
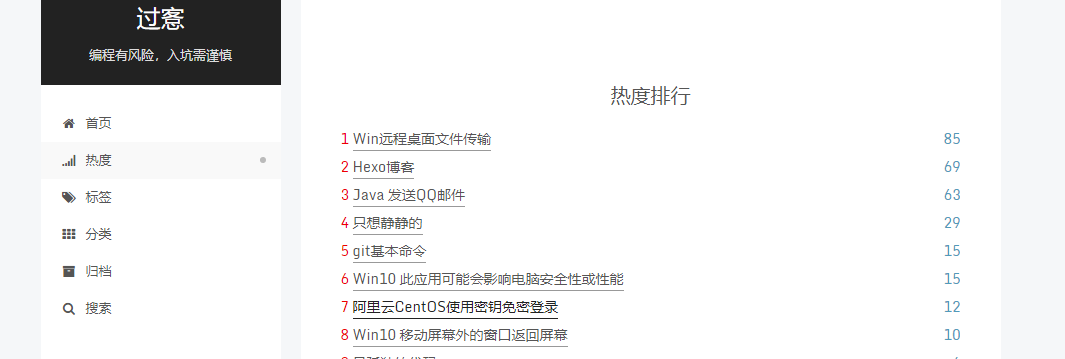
十、新增阅读排行页面
next中有一个firestore的排行,但是这个是基于Google的,所以国内很难访问,下面加一个用 leancloud 来实现的。首先要开启leancloud_visitors文章统计功能
1. 新建排行页面
hexo n page top 新建页面,会生成 top 目录,编辑其中自动生成的 index.md 文件,将其中的代码替换如下:
---
title: 热度排行
---
<div id="top"></div>
<script src="http://cdn1.lncld.net/static/js/av-core-mini-0.6.4.js"></script>
<script>AV.initialize("leancloud_appid", "leancloud_appkey");</script>
<script type="text/javascript">
var showTop = function(){
  var showCount=25
  var time=0
  var index = 0;
  var title=""
  var url=""
  var query = new AV.Query('Counter');
  query.notEqualTo('id',0);
  query.descending('time');
  query.limit(showCount);
  query.find()
    .done(function (todo) {
      for (var i=0;i<showCount; i++){
        var result=todo[i].attributes;
        time=result.time;
        title=result.title;
        url=result.url;
        if(url==='url'){
          // 如果网络延迟导致获取数据失败,1秒后重试
          setTimeout(showTop,1000)
          return
        }else {
          index++;
          var content="<div><span class='pull-left'><font color='#EE0000'>"+index+"    </font>"+"<a href='"+".."+url+"' rel='section'>"+title+"</a></span><span class='pull-right'><font color='#519ABA'>"+time+"</font></span></div><br>"
          document.getElementById("top").innerHTML+=content
        }
      }
    })
    .fail(function (object, error) {
      console.log("Error: " + error.code + " " + error.message);
    });
  }
setTimeout(showTop,1000)
</script>
并将其中的 leancloud_appid、leancloud_appkey替换成你自己的。
##2. 配置菜单显示
编辑主题配置文件 themes\next\_config.yml,添加 top:
menu:
  home: / || home
  top: /top/ || signal
3. 新增菜单栏的显示名称
hexo/theme/next/languages/zh-Hans.yml,同样新增 top 对应的中文:
menu:
  home: 首页
  archives: 归档
  categories: 分类
  tags: 标签
  about: 关于
  search: 搜索
  schedule: 日程表
  sitemap: 站点地图
  commonweal: 公益404
  top: 热度
4. 测试
hexo clean && hexo s
十一、文章置顶
1. 安装插件
npm uninstall hexo-generator-index --save
npm install hexo-generator-index-pin-top --save
2. 修改置顶标签
然后在需要置顶的文章的Front-matter中加上top: 10即可。比如下面这篇文章:
---
title: Hexo博客
categories: 软件使用
tags:
  - 软件使用
abbrlink: 2fe3da
date: 2020-02-09 15:55:55
top: 10
---
说明: 可以多个文章置顶,top值越大,文章排最前
3. 设置置顶标志
打开:/themes/next/layout/_macro 目录下的post.swig文件,定位到
{% if post.top %}
  <i class="fa fa-thumb-tack"></i>
  <font color=7D26CD>置顶</font>
  <span class="post-meta-divider">|</span>
{% endif %}
4. 效果

十二、发布时通过ssh使用远程服务器自动拉取
最近把服务器改成了阿里云的ECS,每次发布的时候还得手动去服务器上pull一下代码,感觉挺麻烦的,于是写了一个插件可以自己拉取。
1. 安装插件
npm install hexo-zngw-asset-image
2. 配置服务器信息
打开博客目录下的_config.yml配置添加:
zngw_sshpull:
    host: zengwu.com.cn   ## 需要更新的服务器地址,可以是ip也可以是域名
    port: 22              ## 服务器ssh连接端口
    username: root        ## ssh连接用户名
    # password:           ## ssh连接密码,如果填了密码,则私钥无效
    key: ./zngw.pem    	  ## ssh私钥文件,相对博客根目录路径或绝对路径
    dir: /data/web/blog   ## 博客在服务上的目录,不填写刚不进行目录移动
    exec: git pull        ## 执行的更新命令,也可以在服务器上编写批处理用这个调用
3. 配置发布信息
打开博客目录下的_config.yml配置在deploy提交git后添加
deploy:
- type: git
  repo: git@github.com:zngw/zngw.github.io.git
  branch: master
- type: zngw-sshpull  # 添加上传配置
4. 发布
先在服务器上下载并配置好git,使git记住密码可使用密钥。然后这边发布的时候直接hexo d就可以了,先会提交到git上,结束之后就会ssh连接到服务器执行git pull拉取操作。也可以在服务器上写个批处理,处理自己想要的。
遇到的一些问题
1. 分页显示问题
问题: 切换成next主题后,分页会显示乱码

参考:https://github.com/hexojs/hexo/issues/3794
解决办法:
打开themes/next/layout/_partials/pagination.swig文件修改
{%- if page.prev or page.next %}
 <nav class="pagination">
   {{
     paginator({
       prev_text: '<i class="fa fa-angle-left" aria-label="'+__('accessibility.prev_page')+'"></i>',
       next_text: '<i class="fa fa-angle-right" aria-label="'+__('accessibility.next_page')+'"></i>',
       mid_size: 1,
       escape: false
     })
   }}
 </nav>
{%- endif %}
关闭 highlight 后,代码块swig语法显示问题
问题,如:swig语法代码
{% if page.comments && theme.gitalk.enable %}
  <link rel="stylesheet" href="//unpkg.com/gitalk/dist/gitalk.css"/>
  <script src="//unpkg.com/gitalk/dist/gitalk.min.js"></script>
  <script type="text/javascript">
    var gitalk = new Gitalk({
      clientID: '{{ theme.gitalk.ClientID }}',
      clientSecret: '{{ theme.gitalk.ClientSecret }}',
      repo: '{{ theme.gitalk.repo }}',
      owner: '{{ theme.gitalk.githubID }}',
      admin: ['{{ theme.gitalk.adminUser }}'],
      id: location.pathname,
      distractionFreeMode: '{{ theme.gitalk.distractionFreeMode }}'
    })
    gitalk.render('gitalk-container')
  </script>
{% endif %}
关闭highlight后,显示的结果为

解决办法:
网上找了很多资料都没有看到相应的解决办法,后来自己跟踪配置文件的highlight变量,找到node_modules\hexo\lib\hexo\post.js文件的cacheObj.escapeAllSwigTags(data.content);解析导致的。
我这里的解决办法是,md格式文章内容不做这个解析。搜索到cacheObj.escapeAllSwigTags(data.content);代码,加入 && ext!=='.md'
      // Escape all Swig tags
      if (!disableNunjucks && ext !== '.md') {
        data.content = cacheObj.escapeAllSwigTags(data.content);
      }
这样就该后,结果为:
需要注意的
在MD写文章的时候,在非代码块位置不能出现swig的语法字符串。否则编译就会报错。所以如果代码,就用"```"包含代码块中,即使"`"都不行
参考文章
- https://hexo.io/zh-cn/
- http://theme-next.iissnan.com/theme-settings.html
- https://www.jianshu.com/p/9f0e90cc32c2
- https://www.zfl9.com/hexo-code.html
- https://introspelliam.github.io/2018/07/09/hexo/NexT主题中集成gitalk评论系统/
- https://www.cnblogs.com/ldnh/p/7675704.html
- https://postgres.fun/20190116150800.html
- https://hoxis.github.io/hexo-next-read-rank.html
- http://wangwlj.com/2018/01/09/blog_pin_post/


评论区