
OpenClaw 多个 Agent 好处,首先是每个Agent相互隔离,上下文不污染,每一个Agent只负责自己的事;其次可以是模型路由,不同Agent调用不同的模型。专业的模型干专业的事,省费用且专业性强。
废话部分
最近发现老黄(NVIDIA)的免费模型有点慢,不是速率限制,可能免费使用的人太多,导致算力不够,在排队吧,好多都返回在几百秒以上了。这时,阿里及时送来了大礼包Coding Plan,活动截至时间2026 年 4 月 1 日0点。7.9元包月,一杯密雪冰城的价格,每5小时1200次请求,一月共18000次请求,只按请求次数算不计token数。可以使用的模型有qwen3.5-plus、qwen3-max-2026-01-23、qwen3-coder-next、qwen3-coder-plus、glm-4.7、kimi-k2.5等。
https://www.aliyun.com/benefit/ai/aistar?userCode=bc0o1jx7
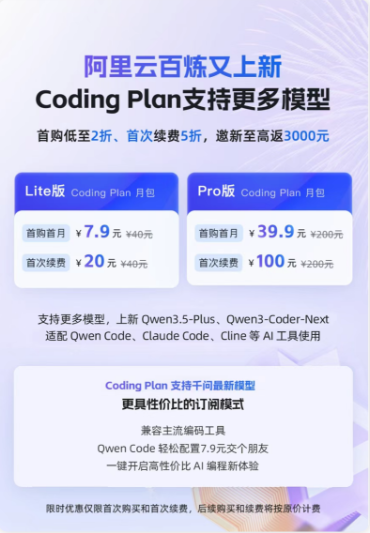
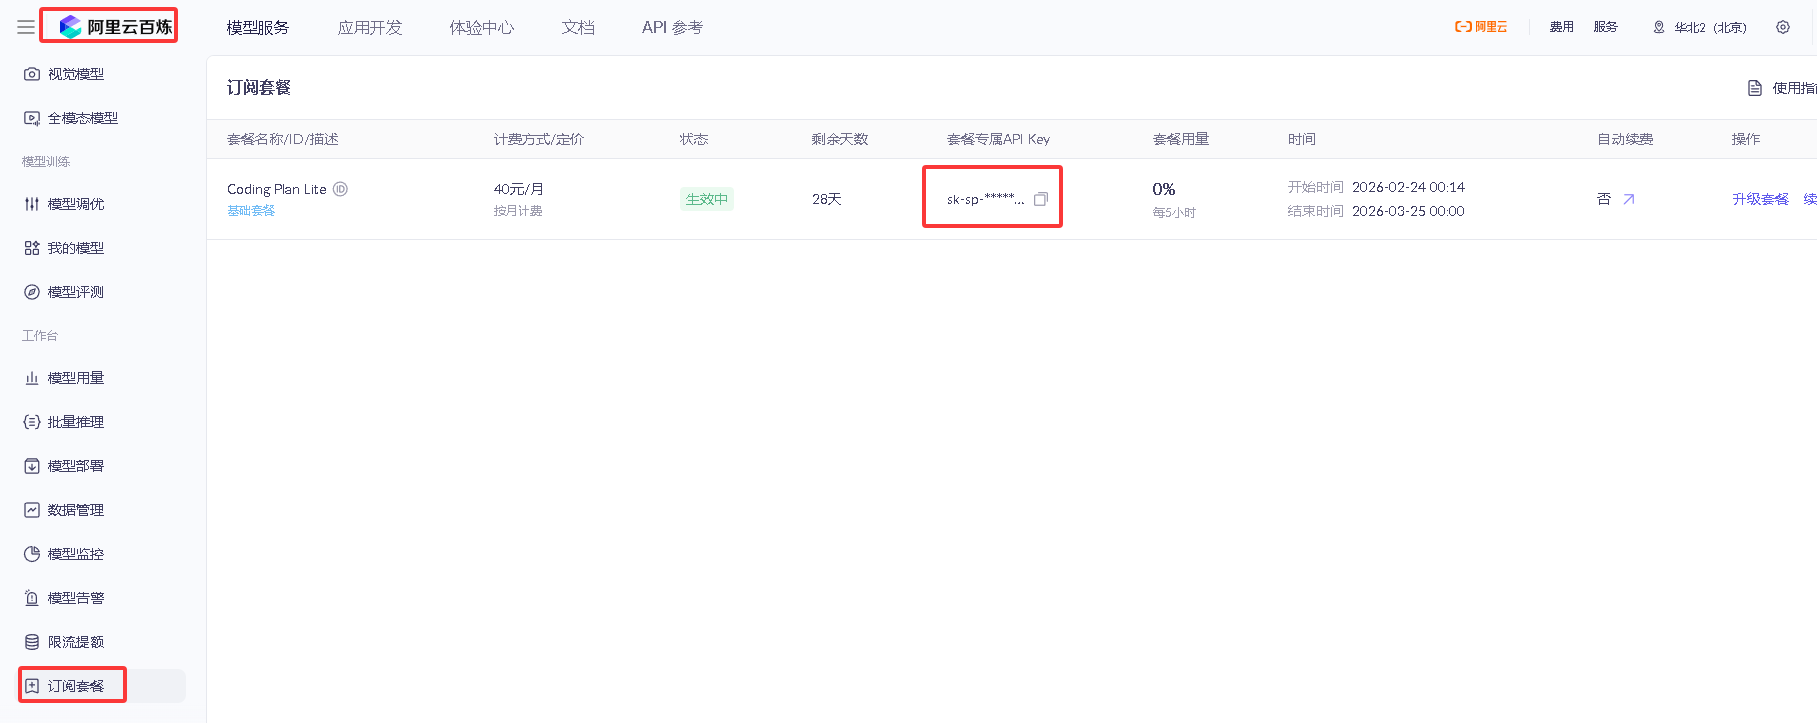
打开阿里云百炼活动页面,拉到下面直接购买,然后获取Coding Plan计划中的Key(与百炼的Key不同),使用方式和百炼不一样。
https://coding.dashscope.aliyuncs.com/v1
飞书配置方式
这里设定3个Agent,使用同一个飞书机器人,在私聊+二个不同的群里扮演三个不同的角色。需要更多的角色,可以按以下方法自己设定。
1. 在飞书中创建二个群,并将机器人拉进群
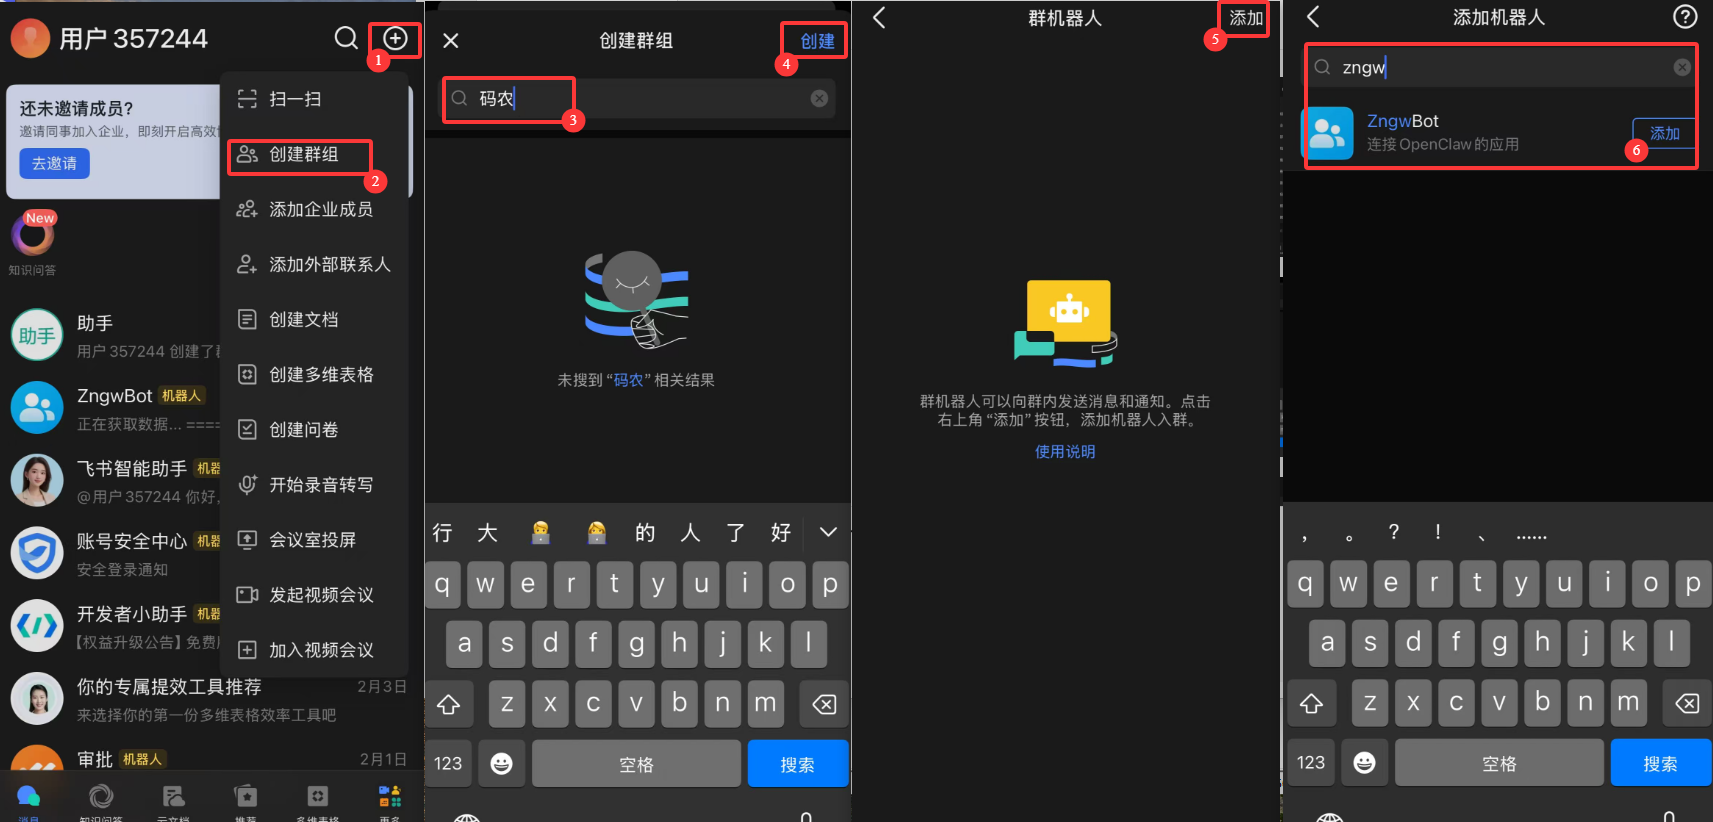
- 在手机飞书App上点右上角“+”创建群组
- 输入群名称,再点右上角创建
- 进入群组,点右上角“...”,选择机器人,再弹出的页面,点右上角"添加"
- 搜索机器人的名字,添加。
2. 创建多个agent
openclaw agents add helper
openclaw agents add coder
- main:默认缺省,全能助手,使用
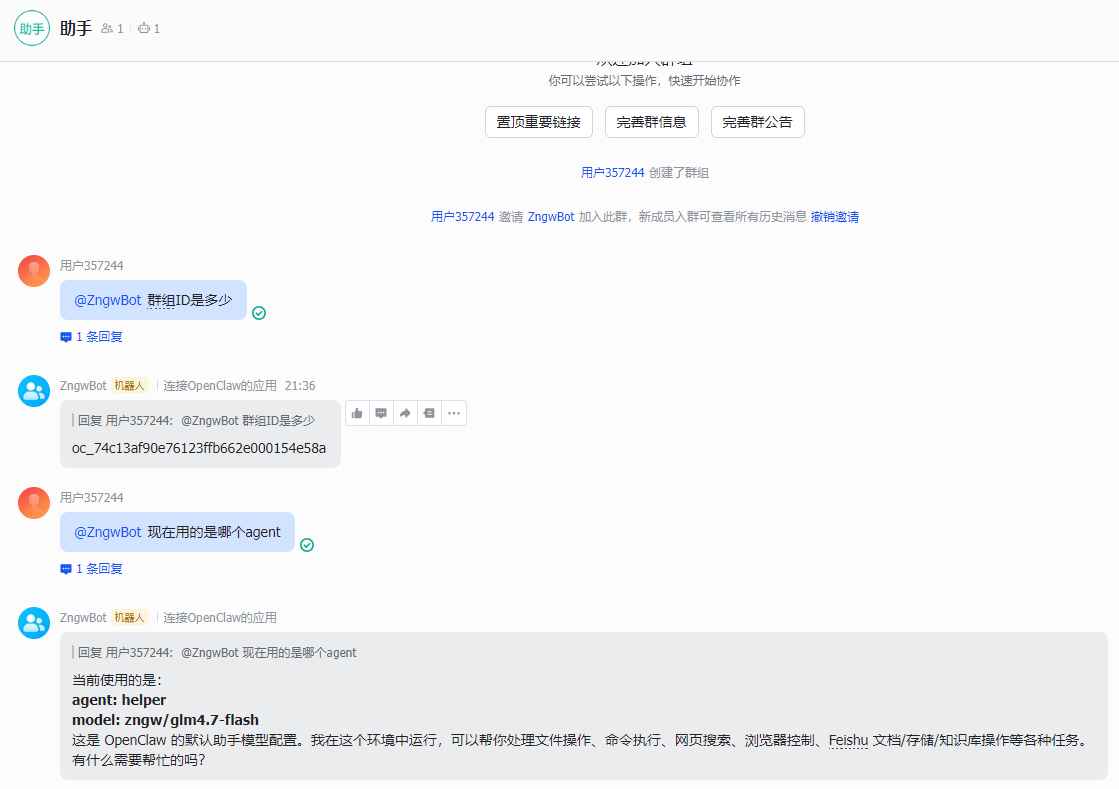
阿里百炼 qwen3.5-plus模型,私聊机器人调用 - helper:辅助助手,使用
智谱 glm-4.7-flash(免费),虽然是30B模型,但是用来处理日常邮件、定时任务等差不多够用,在助手群里@机器人调用。 - coder:码农,使用
阿里百炼 qwen3-coder-next模型,处理代码、编程相关,在码农群里@机器人调用。
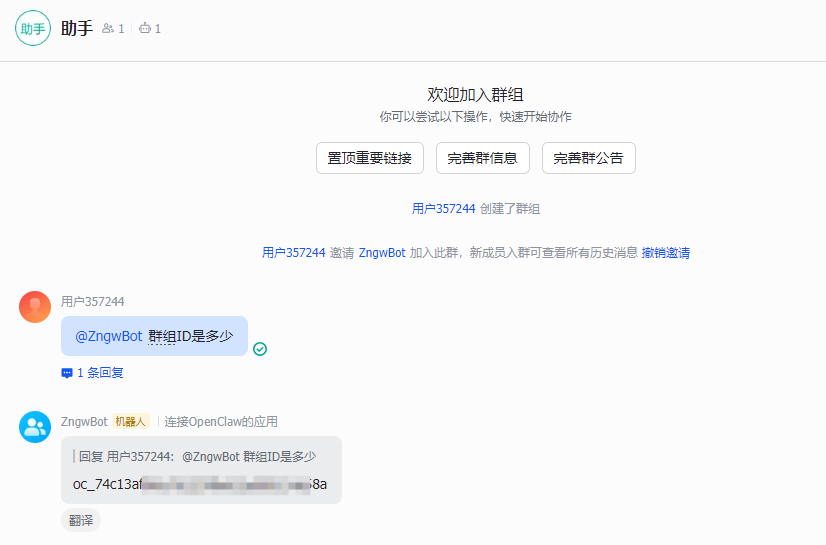
3. 获取群id
直接在群里@机器人 群组ID多少,就可以等到机器人回复当前分组ID了。分别获取二个群组的ID。
4. 配置 openclaw.json
主要配置一下agents.list agent 参数配置 和 bindings 路由配置。
{
"agents": {
"defaults": {
"model": {
"primary": "zngw/qwen3.5-plus",
"fallbacks": [
"zngw/glm4.7-flash"
]
},
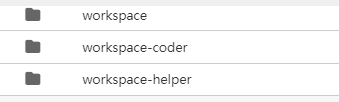
"workspace": "/root/.openclaw/workspace",
"compaction": {
"mode": "safeguard"
},
"maxConcurrent": 4,
"subagents": {
"maxConcurrent": 8
}
},
"list": [
{
"id": "main",
"default": true,
"model": "zngw/qwen3.5-plus"
},
{
"id": "helper",
"name": "helper",
"model": "zngw/glm4.7-flash",
"workspace": "/root/.openclaw/workspace-helper",
"agentDir": "/root/.openclaw/agents/helper/agent"
},
{
"id": "coder",
"name": "coder",
"model": "qwen3-coder-next",
"workspace": "/root/.openclaw/workspace-coder",
"agentDir": "/root/.openclaw/agents/coder/agent"
}
]
},
"bindings": [
{
"agentId": "helper",
"match": {
"channel": "feishu",
"peer": {
"kind": "group",
"id": "oc_前面获取的 助手群组ID"
}
}
},
{
"agentId": "coder",
"match": {
"channel": "feishu",
"peer": {
"kind": "group",
"id": "oc_前面获取的 码农群组ID"
}
}
}
]
配置好后,openclaw gateway restart 重启测试,看到以下输出说明agent和路由配置成功。
5. 配置各agent下的soul和user.md
需要在/root/.openclaw/workspace-helper和/root/.openclaw/workspace-coder目录下,分别为agent配置不同的“性格”。
6. agent相互通信
默认情况下,每个agent是独立的,需要想要不同的agent之间通讯,需要配置 tools.agentToAgent参数,比如要让"main"和"helper"可以通信
{
  "tools": {
    "agentToAgent": {
      "enabled": true,
      "allow": ["main","helper"]
    }
  },
}
到这里,多 Agent 的基本玩法就讲完了,如果是其他的IM,大致逻辑差不多,只是"bindings"参数做一下调整就可以了。
Telegram配置方式
使用三个机器人分别绑定到三个agent上,然后把三个机器人加入到同一个群组中,三个agent创建上面有就不多说了。
1. telegram创建bot
在Telegram中添加BotFather,输入 /newbot,输入机器人名字,ID,并记录机器人Token。再然后输入/setprivacy选择添加的机器人,选择Disable,同样的方法再创建二个。
| 机器人ID | 机器人昵称 | 绑定Agent | 描述 |
|---|---|---|---|
| zngw01 | 灵儿 | main | 全能助手,缺省agent |
| zngw02 | 助理 | helper | 辅助助手 |
| zngw03 | 码农 | coder | 码农 |
2. 创建群组
创建群组,把三个机器人拉进群组,在群里发消息,查看openclaw日志,获取群组ID
tail -f /tmp/openclaw/openclaw-*.log | grep telegram
然后能看到{"chatId":-5012345678... 的字样,负一大串数字。
3. 配置 openclaw.json
主要配置一下agents.list agent 参数配置 和 bindings 路由配置。
{
  "channels": {
    "telegram": {
      "enabled": true,
      "dmPolicy": "pairing",
      "groupPolicy": "allowlist",
      "groups": {
        "-5012345678": { "enabled": true }
      },
      "streaming": "partial",
      "accounts": {
        "default": {
          "name": "灵儿",
          "dmPolicy": "pairing",
          "botToken": "灵儿机器人的Token",
          "groupPolicy": "allowlist",
          "groups": {
            "-5012345678": { "enabled": true }
          },
          "streaming": "off"
        },
        "helper": {
          "name": "助理",
          "dmPolicy": "pairing",
          "botToken": "助理机器人的Token",
          "groupPolicy": "allowlist",
          "groups": {
            "-5012345678": { "enabled": true }
          },
          "streaming": "off"
        },
        "coder": {
          "name": "码农",
          "dmPolicy": "pairing",
          "botToken": "码农机器人的Token",
          "groupPolicy": "allowlist",
          "groups": {
            "-5012345678": { "enabled": true }
          },
          "streaming": "off"
        }
      }
    }
  },
  "bindings": [
    {
      "agentId": "main",
      "match": {
        "channel": "telegram",
        "accountId": "default"
      }
    },
    {
      "agentId": "helper",
      "match": {
        "channel": "telegram",
        "accountId": "helper"
      }
    },
    {
      "agentId": "coder",
      "match": {
        "channel": "telegram",
        "accountId": "coder"
      }
    }
  ]
}


评论区